Wednesday, May 8, 2019
The final post.
It has come to an end, and I have to say I have learnt a lot from this whole experience. I am really happy with the animation that we made, yes unfortunately we wont be handing in a finished film, but whether or not its finished I am still very proud of it, and everyone that worked on making the film. I learnt a lot about the way I work and plan on taking that forwards with me in the future.
Colours, colours and more colours.
I forgot to mention in one of my earlier posts, but there is a way to apply an overlay using TV paint. To show what I mean here is a video of me showing how I do it.
More or less it is just a drag and drop function where you drop an image on top of another.
I also made a page of all of Anthonys colours.

We also finally decided on a colour for the overlay, I made a few different attempts of what it could look like such as a purple colour, and then a much more lavender colour, eventually with help from Carla we decided on a colour that we felt matched the background appropriately.

We decided on the last colour and with an opacity of 47% as it gave the best outcome.

Tuesday, May 7, 2019
Making the book
The visual journal :-
Ive started making our visual Journal, beginning with our opening page. I did a few rough version for my group to choose from, here are my roughs :


The top one was the groups collective favourite there for I made a final version.

I did however make this on the wrong size, it is meant to be A4 but I made it A5. Therefor Ive had to remake it but it didn't take very long.

Here it is redone.
I also put all the pages together, with help from Carla rendering out the images and sending them over to me which made things go a lot quicker. Chloe has also added text where necessary to help explain some of the shots in the book.
Here are a few screen shots.


Contacting a music student.
After the social event that was set up for us to meet the music students of leeds Music university, we found a musician that did the sort of music that we wanted, a very ambient sort of music, with a focus on classical music.


We where really glad to hear that he was happy to help us, so I quickly sent over our animatic.

And with in the week we got a response.

We liked it, but some elements of it we felt weren't working as how we wanted we sent a response :
To begin thank you for doing this for us.
There are a lot of elements to the music that we really like, such as the music in and leading up to the credits. We do however feel that the music during the middle section is a little to intense for what we are going for. We do have someone to do the narration for us (but thank you for offering) this weekend. We can send this to you, and then you could compose over the top of it, if this would help you understand the tone of the scene. We appreciate the extra effort you have gone into with the extra sound effects in certain scenes but we do have some sounds we plan on using.
Would you mind meeting up with us at some point, as we could better explain what we are going for.
Thank you
Chloe, Carla and Medi
He did ask if we could maybe give him the animation at a later date so that he could see it more fleshed out. But we said that it would match the animatic so that would be waste of time for him.
We decided the best solution would be to meet in person and discuss what we wanted to do. We agreed that the 4th of march would be ideal. We meet up with him at Leeds collage of music, as he could give us some examples of what he could do. We found it to be really enjoyable, he listened to what we had to say and the examples he played for us where exactly what we wanted, we left really happy and looking forward to what he was going to make.
We sent him another version of the animatic a few days later, so that he could do another version using an up to date version.
Unfortunately we made some small changes as time went on and had to send him another version with the updated timing. He was very understanding about it and made the alterations where necessary.

We are really happy with the music, it follows the animation and adds suspense where needed, all in all it was really great working with Nik.
He asked for a few details about us for his work and we asked for the same and plan to add him into our art book.
Here is his website : NikRobinson.com
Another Live brief.
I have actually finished all the live briefs I had to do, but saw no harm in doing another one. I decided character design would be a another fun one to do. This months theme was Kabuki. Which is a traditional Japanese art from, done in dance.
As I am not well versed in the art of Kabuki, I watched some youtube videos about the topic to get a little more understanding of the art form, for example women are barely ever used in this, men dress up as women and are referred to as onnagata.
I decided to go back to the good old days and did some art with out lines, I definitely think I need more practice to do this again, but its a start.

 Been submitted
Cleaning Up shots for Ally and Anna
Separate to our project I have actually done some work for other peoples groups, not a lot as a lot of my time is taken up by my project with Carla and Chloe. But I was asked by Anna and Ally If I would remove a few rigs for them, which I have done. I have though never done clean up like this before, I have only ever done line art so this I was going into blind and a little afraid.
The first scene I got was of the main character floating out of her chair , I found this relatively easy to do, I used the eraser for the most part but also used the auto correction tool (the plaster tool is how I've been referring to it.) This took me around an hour to do.
Original
The also asked me to do some clean up of the Jelly fish, but this one I found very difficult to do. The issue was that they had forgotten to take a picture of the background before starting the scene, and I am no clean up expert as I have never done anything like this before I was a little at a loss as to what to do. Even so, I tried my best.
The original
I started by painting a background that sort of resembled the pre-existing one. I then went and did a block of colour masking the majority of the rig, and then went in to individually remove frames, this did not look good. It was jumpy and just bad.
Attempt 1.
I then went in and did another version where I painted some of the frames and that did work either.
Attempt 2.
Finally I did one painted frame, and moved it along with the Jelly fish, changing it where necessary. This was the best way I could find to do it, I did too, fixing one up a little more.
The final.
These where the only shots id been given, and I feel I've learnt something from this, mainly that I don't want to do it again.
Cleaning Up other shots. - 5,11,13,20,21
Clean up.
Ive decided to do my clean up blogs as one big post as It will just be easier to see it all In one.
I have been given roll of clean up for our animation, this makes it easier for everyone else to do there roughs continuously as I clean up the work.
Shot 5 :-
I began with shot 5, this was a shot Carla had animated, and had done some clean up for, but after some discussion the character wasn't completely accurate it was incredibly close, but it just need some refining there for I took the scene, did some revision of the roughs and then re-did the line art and coloured the scene in.
Carla's roughs
SHOT 5 clean up and coloured.
Shot 11 : -
Shot 11 was another one of Carlas scenes, this time it was done In a class room which Is one of the two shots we have that actually take place during the day. This one is meant to be a panning zoom, but after looking at it again recently we decided that Anthony was in the wrong place there for I will eventually have to go in a tweak where he is sat, but that will take place after hand in.
Carlas roughs
Shot 11 clean up and coloured.
Shot 13 :-
This one is one of Chloe's scenes. This one was a bit of a struggle to do, reason being this shot has a very close in zoom, and we where debating which would be the best way to animate it. At first we tried taking Chloe's roughs and using after affects applying the zoom to the roughs so that I could draw the zoom frame by frame to ensure the line art would stay crisp. I animated about a second of this, but found it very difficult to do as I couldn't really use onion skins as it was pointless as each frame would get smaller and smaller. I spoke to Chloe and she agreed it was a bit of a difficult solution. We decided to ask Liam our local tech genius, to see what his solution would be. He suggested I do the line art on a normal not zoomed rough and then render out the line art on a really crisp setting such as 4k or 8k. This seems like a really good idea. Another issue we ran into was time, as this is the most recent shot I have cleaned up this weekend is the long weekend meaning Uni is closed on Monday, and as I don't have tv paint at home I cant finish the clean up. I asked Carla if she could finish of the scene, as it is just the friends that need to be finished and they are mainly stills, I drew one frame to give her something to start with. I did though manage just in time to finish Anthony's lines.
Chloes roughs.
The original zoom clean up
The final clean up.
Shot 19 :-
Another of Carlas scenes.
This one is pretty straight forward, I had originally done the whole scene before this one so it felt like just a continuation of that shot. There is not much to say about this one in comparison to my last shot. I did add some texture to the bed sheet to show where is body is and animated it to move with him.
Carlas roughs
Clean up and colour.
Shot 20 :-
Again a very simple scene, another of Carla's. I quite enjoyed doing this shot, it was a simple and It felt relaxing to do.
Carlas roughs.
Clean Up and colour.
Shot 21 ;-
This one was one of Chloes shots. This one actually has the shadow man in, so I was really excited to the clean up for him. It took a little longer to clean up and animate him, as he is completely black, which a few white outlines. What I did for him was did the black outline first, then colour him in completely black, then using a duplicated version of the line art using a clipping mask of sorts to colour of the line art with white where you are meant to see it. I then after completely finishing the shadowman's clean up I went on to do the friends afterwards.
Chloes roughs.
Shadow man:
Finished scene all together cleaned and coloured.
Shot 18
I said in my last post that I had just finished my last scene and was ready to start cleaning up other peoples scenes. But at that point nobody had anything for me to clean up yet, so we decided I should do a another scene so I would have something to do. The shot was number 18, and is a small scene of all three of the children asleep in bed.
Here are my roughs.
I wanted there movements to be subtle and not all happening at the same time so I made sure to offset them with each of their movements.
Here are the lines, Im honestly not to happy with this scene, but as things stand how they are I don't really have time to go back and fix it at the moment, maybe once everything is finished and I have enough time I will go in and correct things.
Shot 14
Shot 14.
This is my last shot of my own, and its just a still image for me, so honestly this took me almost no time at all and there isn't much to say about it. I had to make sure that the camera looked the same as I had done in the previous shot for consistency. The black space in the screen will be filled with footage Calra is going to make to look like a video recording.
Saturday, April 13, 2019
Shot 8
Shot 8.
Back into animating.
I was sooo excited to get back into roughing out extra, and I am quite pleased with this shot!
I did some looking for reference of people rummaging through cassette tapes, but honestly they don't exist. I did how ever learn a lot about cassette tapes, for example there is only one cassette tape factory left.
Shot 16.
Shot 16.
The scariest of all my shots, and the most time consuming. I didn't take into account how big of a scene this shot really was, three characters all moving at similar timings, for 7 seconds. It was a lot harder to do than I had anticipated.
I started by figuring out how I should animated the shot, as its a panning shot with a moving background. And as I am rather rusty when it comes to animating, I wasn't sure if I should animated onto the already moving background, the answer no. I discussed with my tutors what I should do, as in should, I animated on the still background or the moving, they said definitely still, as animating on a moving one could cause the character to slide across the scene. So I started roughing out the timings of each of the characters.
I also added the pan in using after effects, and I was pretty proud of this, and honestly really enjoyed working it out.
My next hurdle was the roughs, as this meant figuring out a lot more of the movements, which was very scary and quite challenging, this I did not enjoy as much, as It was a lot of trial and error, I roped in Helen to do some reference for me, which was a challenge in its self as our university doesn't have a bed to climb over, so we had to make do with the bathroom sink.
This was really helpful, as I was really struggling getting Anthony's movement right, and this cleared things up for me. Here are the roughs I finally was happy with.
I had a bit of struggle with the boy in the front, but decided to figure that out in my next set of roughs.
I did still struggle with the boy in the front, (Charlie) as he grew and was clunky. But I decided again that I could fix this in clean up. By this point a week had gone by, so I really wanted to get cracking. I also had a chat with my team about Anthony and the camera, as in the shot prior to this he was holding a camera, and I didn't know what to do with it, as if he was climbing onto the bed, where would the camera go? I originally had him carrying it with him, but it was clanky, the camera disappeared sometimes, it was just awkward. So I put it to the group, and we decided that we would alter the shot before so that Anthony throws the camera aside and I just draw in a camera on the floor.
Line Art, this took an extraordinarily long amount of time, and I put that down to it being three individual characters all moving at the same time. And the fact that I did them all on there own separate layers, to making sure every movement was consistent. This took maybe a week and a half to do in the end, longer than I wanted, but It was done and I was still pretty ahead of schedule anyway so I wasn't overly worried.
Here is each of them individually so you can see each movement clearly.
Overall this shot took around 3 weeks to do, and I do think it could be better, and If I have the time, I may go in and change somethings about it, but in the mean time, its done, and I have other work that desperately needs my attention.
Monday, March 11, 2019
Shot 7
Animating a camera.
This I struggled with a little, id say I am pretty fair at animating people, not as good as I would like, but I can draw a thing that at least looks like a person, but an object is not something I have every really animated before there for, I was honestly a little nervous for it which definitely showed.
It started by looking at the camera Bach drew for out backgrounds.

His background has quite a small compact camera, with a rounded end.
This video I made to block out the timing of the shot.


I also used the mechanical sharpener as reference for how a hand would look holding an object of a similar size to the camera.
I also filmed some movement reference using the same sharpener, so that I could properly time and have an accurate movement.
This is what id done for my first rough, I sent it to the group which they green lit for me to jump into the line art. So I went right to It.
This was my first version of the lineart, but I though that the strap I had added had way to much of a swing to it, with made the shot look to busy, therefor I redid the swing on the shot as I wanted it to look natural.
I took out a few frames and cleaned it up abit, and this was the result. I showed it to the class and and most agreed that this shot was better.
Even so, I was not happy. The shot was very robotic, the angle was odd, and I know I could do better.
Therefor I asked the group if it was alright if I redid the shot as I am ahead of schedule anyway. They agreed and I hopped to it.
This was the outcome, to get a much more accurate version of what the camera should look like I watched a video of a man looking at a similar sort of camera. I also added the click of a button to open the tape part, as after watching the reference and talking to peers they pointed out that it is opened mechanically with the push of a button. All together this shot had a much more accurate representation of what a camera should look like.
This gave a much more detailed version of what the camera should look like so I could draw a much better version that I was happier with.
Here was the final outcome, I was able to line and colour and animate it in one day due to the amazing program TV paint, which is amazing! Even If I did redo the scene this whole thing only took me two days to do, including redoing the scene, therefor there was not loos of time.
Monday, March 4, 2019
The next scene Shot 2.
Im really amazed by TV paint, it is an amazing program.
I started doing the roughs for shot 2.
This was my first attempt. It is a 4.5 second clip and I tried to cram to much animation into this one scene.
This was my second try but he seams as though he's sliding down the bed.
This was my final rough, which I cleaned up a little, so that it would be easier to animate over.
Here is the finished lineart, we are working in twos but I switched to ones when it came to the head drop just to give it the quicker drop.
When it came to the colouring, I can say I am thoroughly amazed by this program, my colouring time was cut down tenfolds.
Liam suggested I colour in a much quicker way as I was sat colouring in each frame with the pen tool...like a fool as tv paint is far superior.
He showed me quickly a much better way, which I then googled and found a youtube video that showed me a much...much better way of colouring in.
Here is the coloured version, which I finished more or less the same day that I finished the lineart, which is amazing!
Obviously he doesn't quite match the colouring of the background so I did some tests of colours we could use as an overlay, only to find that the version of tv paint we have doesn't have a sort of clipping mask tool that I can make a multiply layer with, therefor I attempted it in tv paint.
I put them to the group and they suggested that we leave the tinting till the end of the animation therefor I will move on to the next scene.
Animating in TV paint.
I am very used to animating in Photoshop, but Tv Paint is or was, a completely unknown program to me. But we as a group agreed to animate in TV paint as it is industry standard and it will help build our CVs which is something I would really appreciate.
Therefor this week I began animating using the program.
My first scene is a very simple scene of an animated steamy mug of coffee.
This was my second attempt but it has the impression of somebody walking past which is not what we want at all.
I feel from just this 3 second scene I have learnt a lot about tv paint, and am excited to use it for future scenes.
I am pleased I had a rather basic scene to start off with as it slowly introduced me back into animating. It gave me time to readjust my self back into the animation world.

Saturday, February 23, 2019
Character Design Challange
This months CDC topic was caveman. I did more than one design, starting with this hairy man, I liked him and though he was rather stylised.


I then did another design and liked her too.
Both have very different styles therefor it was hard to choose which to submit, but I am happy with my decision. Which was to choose the girl design.
I decided to choose the girl as she had a much more dynamic position, and I am proud of the angle I put her in.


(A later addition: A few people have pointed out the he looks a little like Captain Caveman, and I cannot unsee it.)


I then did another design and liked her too.
Both have very different styles therefor it was hard to choose which to submit, but I am happy with my decision. Which was to choose the girl design.
I decided to choose the girl as she had a much more dynamic position, and I am proud of the angle I put her in.

LoopDe Loop 2
Sadly my loopdeloop got rejected.

And I think what they said was perfectly reasonable.
My loop was very plain, and not very interesting to watch, but it was a learning tool for me and I am very pleased that I have done it still.
Instead of changing my first design as I am proud of it the way it is, I thought I would make a 2d animated creation, as I haven't animated in a while and it is a way for me to practice ready to animate on my larger project.

Here was my first attempt
second attempt
Here is the finished video I have submitted with sound.


Sunday, February 17, 2019
LAUAN603 - The big one, Week 9.
This week we had a conversation with tutors, one said that the friends didn't work, the other said that the shadow man didn't work. So I started doing some variants.

I do plan on changing Charlies eyes as they don't really match the other two characters eyes.

I also tested out how the characters would look with the backgrounds, and I am quite happy with the outcome.

I've also done some variants of the shadow man as I wanted to see if there was something better I could make.


I showed these to our group and they thought the original was the best, so we plan on keeping the original design.
https://twitter.com/search?q=draw%20your%20sleep%20paralysis&src=tyah
https://twitter.com/slimyswampghost?lang=en
We found a tag on twitter that people had been using to show what there sleep paralasis looked like, and our original design matched the things people had drawn the most.
LAUAN603 - The big one, Week 8.
This week I focused on the friends designs.

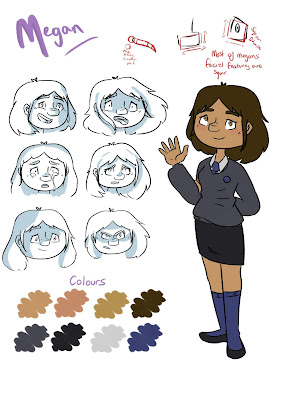
I created some finished pages for them and also did some versions of them in pyjamas.


We decided that Megan should be waring long pants as one she is meant to be a little bit of a tomboy, and two a girl of her age would probably feel rather uncomfortable in shorts.

The yellow of his top is a little bright though, so I will make that duller.

I also made a turn around for the shadow man.


And a height comparison page.


T-poses of Megan and Charlie, I was really happy with these as I liked the yellow background I used as I felt it made them feel lot more professional.
Subscribe to:
Comments (Atom)